You can use Xcode's Organizer window to easily do actions such as adding a development device - saving you from logging into the developer's website and adding the device manually.
When using any of the Organizer's features that requires access to your developer's account for the first time, you'll be asked for your AppleID and password. Any subsequent use will be done silently without prompting you for those credentials.
What if you want to change the Apple ID you're using to a different account?
There's no setting or preference in which this is set. To do that, you need to go to the 'Keychain Access' application and filter the list to 'Passwords' (bottom left pane). Look for an entry called 'daw.apple.com' of kind 'Internet Password'. To verify this is what you need to delete, control-click it and choose 'Get Info'. In the window that pops up, you'll see the old Apple ID under Account.
Right click (control-click) the entry again and choose "Delete 'daw.apple.com'".
Quit and relaunch Xcode if it's open as it may have cached the old account information if it needed it. If you try to do something in the Organizer window that needs access to your developer account, you'll now be prompted for your new Apple ID account info.
Wednesday, July 6, 2011
Sunday, May 15, 2011
Xcode File Templates
When creating a new source code file (from a template for example), the file starts with a comment specifying my name and a Copyright notice containing 'private' as the company name. I wanted to change the company name to something other than 'private'.
I started grepping around my project files and found a setting ORGANIZATIONNAME in the project's project.pbxproj file. Digging further (this time in Xcode help) I found that the default for that setting is __mycompanyname__. But where did that come from?
It appears that it comes straight from my address book under the entry for my name. Changing it there caused all my new Xcode projects to use the new company name. I had to restart Xcode for the change in the Address Book to take effect.
In order to change the setting for a specific project, this setting can also be changed from Xcode 4 IDE:
1. Click the blue project icon in the Project Navigator
2. Open the attributes window / pane (Command-Option-1)
3. In 'File Inspector' tab, under 'Project Document', you'll find the 'Organization' setting.
(the new setting will affect only new files).
References: StackOverflow
Thursday, April 21, 2011
Setting up Subversion on Mac OS X Server
In the past I used to use CVS locally on my machine. I loved CVS, but I love Subversion even more.
I have recently purchased a Mac OS X server running Snow Leopard (Mini Server). I comes pre-loaded with lots of stuff, including a web server based on Apache2. I decided that this is a good opportunity to move all my code from local files, regularly backed up - to SVN.
I wanted my repository to be accessible easily using HTTP and also the ability to view it using a browser. In addition, although I'm the only programmer in the house, I wanted stuff checked-in to the repository be authenticated.
I took me quite some time as the built-in server gave me some troubles, but eventually I made it. Here's how:
Step 1 - Create a Repository
At first, I created the repository under 'svn' directory under my home folder (~/svn). I then decided that who knows, maybe my 3 month old son :) would use it some day - so opted to create it under /Users/Shared/svn:
> cd /Users/Shared
> mkdir svn
> svnadmin create svn
I wanted the repository to be accessible using HTTP, so I added:
> chown -R www svn
It is recommended to create at least one file or directory in this repository:
> cd ~
> svn co file:///Users/Shared/svn
> cd svn
> mkdir projects
> svn add projects
> svn ci
Step 2 - Make the Repository Accessible using HTTP
To access the repository using HTTP, I used Snow Leopard's built-in Apache2 server. This step can be done almost entirely using Terminal (command line) - with root privileges either by logging in as root 'su' or using the 'sudo' command. In the following I assume you're logged in as root (su):
First, stop the HTTP server:
> apachectl stop
Create a file named: /etc/apache2/extra/httpd-subversion.conf (create the 'extra' directory if needed - or choose another directory entirely) with the following contents:
<Location /svn>
DAV svn
SVNPath /Users/Shared/svn
</Location>
In /etc/apache2/httpd.conf, add:
# Subversion
Include /private/etc/apache2/extra/httpd-subversion.conf
Also, uncomment the following lines (remove the '#' at the beginning of those lines):
LoadModule dav_svn_module libexec/apache2/mod_dav_svn.so
LoadModule authz_svn_module libexec/apache2/mod_authz_svn.so
We're almost done. Now, go to Server Admin and and click on 'Web' under the server you're configuring. Click 'Sites' on top. Choose the default site and then click 'Options'. Check the 'WebDAV' option and click 'Save'.

If it doesn't work, look at the web server's logs (Server Admin -> Web -> Logs). If there are no logs, Apache wasn't able to start - probably because of an error in httpd.conf or httpd-subversion.conf. Look at the server's logs (Server Admin -> your server name -> Logs; choose 'System Log' at the bottom).
Step 3 - Enabling Authentication
Assuming your server is configured with Directory Services, this is really a simple step.
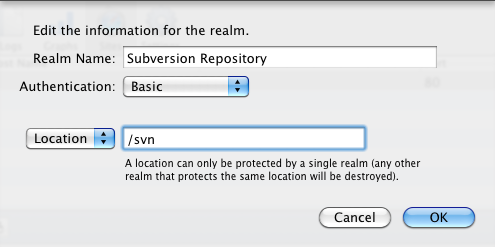
Go to Server Admin -> your server -> Web (on the left). Click 'Sites' and choose the site under which you have configured /svn. Now click 'Realms':

On the left pane ('Realms'), click the '+' button at below the Realms box, and add the following info:
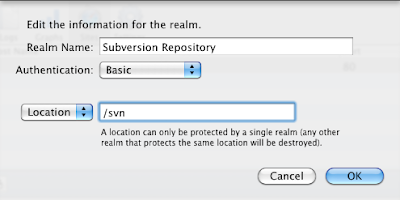
Click OK and then click on the Realm you've just created. On the right pane (Users & Groups), click the '+' button at the bottom and add users and groups you with to grant access to the repository (just drag them into the 'Users & Groups' box). When done, close the 'Users & Groups' selection window and make sure to configure the permissions you wish to grant to each user or group you've added.
Once done, click 'Save'.
Test your new setup using the same URL as above. You should now be prompted for username/password before you're granted access to the repository.
Note: the authentication method described above is not secure. You may want to consider using https instead for a more secure setup. Refer to the first link provided below for more information.
This post is based on the following articles:
Installing a Subversion server on Leopard
How To: Manage Your Own Subversion in Leopard
Subversion on OS X Leopard Server
I have recently purchased a Mac OS X server running Snow Leopard (Mini Server). I comes pre-loaded with lots of stuff, including a web server based on Apache2. I decided that this is a good opportunity to move all my code from local files, regularly backed up - to SVN.
I wanted my repository to be accessible easily using HTTP and also the ability to view it using a browser. In addition, although I'm the only programmer in the house, I wanted stuff checked-in to the repository be authenticated.
I took me quite some time as the built-in server gave me some troubles, but eventually I made it. Here's how:
Step 1 - Create a Repository
At first, I created the repository under 'svn' directory under my home folder (~/svn). I then decided that who knows, maybe my 3 month old son :) would use it some day - so opted to create it under /Users/Shared/svn:
> cd /Users/Shared
> mkdir svn
> svnadmin create svn
I wanted the repository to be accessible using HTTP, so I added:
> chown -R www svn
It is recommended to create at least one file or directory in this repository:
> cd ~
> svn co file:///Users/Shared/svn
> cd svn
> mkdir projects
> svn add projects
> svn ci
Step 2 - Make the Repository Accessible using HTTP
To access the repository using HTTP, I used Snow Leopard's built-in Apache2 server. This step can be done almost entirely using Terminal (command line) - with root privileges either by logging in as root 'su' or using the 'sudo' command. In the following I assume you're logged in as root (su):
First, stop the HTTP server:
> apachectl stop
Create a file named: /etc/apache2/extra/httpd-subversion.conf (create the 'extra' directory if needed - or choose another directory entirely) with the following contents:
<Location /svn>
DAV svn
SVNPath /Users/Shared/svn
</Location>
In /etc/apache2/httpd.conf, add:
# Subversion
Include /private/etc/apache2/extra/httpd-subversion.conf
Also, uncomment the following lines (remove the '#' at the beginning of those lines):
LoadModule dav_svn_module libexec/apache2/mod_dav_svn.so
LoadModule authz_svn_module libexec/apache2/mod_authz_svn.so
We're almost done. Now, go to Server Admin and and click on 'Web' under the server you're configuring. Click 'Sites' on top. Choose the default site and then click 'Options'. Check the 'WebDAV' option and click 'Save'.

Back to the command line, start Apache:
> apachectl start
...or, in Server Admin, click 'Start Web' (bottom left).
This should conclude step 2. Test it by opening Safari on the server and go to the following URL:
http://localhost/svn
You should see the root directory of your repository. If you created the 'projects' directory as mentioned above, you should see it there.
If it doesn't work, look at the web server's logs (Server Admin -> Web -> Logs). If there are no logs, Apache wasn't able to start - probably because of an error in httpd.conf or httpd-subversion.conf. Look at the server's logs (Server Admin -> your server name -> Logs; choose 'System Log' at the bottom).
Step 3 - Enabling Authentication
Assuming your server is configured with Directory Services, this is really a simple step.
Go to Server Admin -> your server -> Web (on the left). Click 'Sites' and choose the site under which you have configured /svn. Now click 'Realms':

On the left pane ('Realms'), click the '+' button at below the Realms box, and add the following info:
Click OK and then click on the Realm you've just created. On the right pane (Users & Groups), click the '+' button at the bottom and add users and groups you with to grant access to the repository (just drag them into the 'Users & Groups' box). When done, close the 'Users & Groups' selection window and make sure to configure the permissions you wish to grant to each user or group you've added.
Once done, click 'Save'.
Test your new setup using the same URL as above. You should now be prompted for username/password before you're granted access to the repository.
Note: the authentication method described above is not secure. You may want to consider using https instead for a more secure setup. Refer to the first link provided below for more information.
This post is based on the following articles:
Installing a Subversion server on Leopard
How To: Manage Your Own Subversion in Leopard
Subversion on OS X Leopard Server
Subscribe to:
Comments (Atom)