You can use Xcode's Organizer window to easily do actions such as adding a development device - saving you from logging into the developer's website and adding the device manually.
When using any of the Organizer's features that requires access to your developer's account for the first time, you'll be asked for your AppleID and password. Any subsequent use will be done silently without prompting you for those credentials.
What if you want to change the Apple ID you're using to a different account?
There's no setting or preference in which this is set. To do that, you need to go to the 'Keychain Access' application and filter the list to 'Passwords' (bottom left pane). Look for an entry called 'daw.apple.com' of kind 'Internet Password'. To verify this is what you need to delete, control-click it and choose 'Get Info'. In the window that pops up, you'll see the old Apple ID under Account.
Right click (control-click) the entry again and choose "Delete 'daw.apple.com'".
Quit and relaunch Xcode if it's open as it may have cached the old account information if it needed it. If you try to do something in the Organizer window that needs access to your developer account, you'll now be prompted for your new Apple ID account info.
Wednesday, July 6, 2011
Sunday, May 15, 2011
Xcode File Templates
When creating a new source code file (from a template for example), the file starts with a comment specifying my name and a Copyright notice containing 'private' as the company name. I wanted to change the company name to something other than 'private'.
I started grepping around my project files and found a setting ORGANIZATIONNAME in the project's project.pbxproj file. Digging further (this time in Xcode help) I found that the default for that setting is __mycompanyname__. But where did that come from?
It appears that it comes straight from my address book under the entry for my name. Changing it there caused all my new Xcode projects to use the new company name. I had to restart Xcode for the change in the Address Book to take effect.
In order to change the setting for a specific project, this setting can also be changed from Xcode 4 IDE:
1. Click the blue project icon in the Project Navigator
2. Open the attributes window / pane (Command-Option-1)
3. In 'File Inspector' tab, under 'Project Document', you'll find the 'Organization' setting.
(the new setting will affect only new files).
References: StackOverflow
Thursday, April 21, 2011
Setting up Subversion on Mac OS X Server
In the past I used to use CVS locally on my machine. I loved CVS, but I love Subversion even more.
I have recently purchased a Mac OS X server running Snow Leopard (Mini Server). I comes pre-loaded with lots of stuff, including a web server based on Apache2. I decided that this is a good opportunity to move all my code from local files, regularly backed up - to SVN.
I wanted my repository to be accessible easily using HTTP and also the ability to view it using a browser. In addition, although I'm the only programmer in the house, I wanted stuff checked-in to the repository be authenticated.
I took me quite some time as the built-in server gave me some troubles, but eventually I made it. Here's how:
Step 1 - Create a Repository
At first, I created the repository under 'svn' directory under my home folder (~/svn). I then decided that who knows, maybe my 3 month old son :) would use it some day - so opted to create it under /Users/Shared/svn:
> cd /Users/Shared
> mkdir svn
> svnadmin create svn
I wanted the repository to be accessible using HTTP, so I added:
> chown -R www svn
It is recommended to create at least one file or directory in this repository:
> cd ~
> svn co file:///Users/Shared/svn
> cd svn
> mkdir projects
> svn add projects
> svn ci
Step 2 - Make the Repository Accessible using HTTP
To access the repository using HTTP, I used Snow Leopard's built-in Apache2 server. This step can be done almost entirely using Terminal (command line) - with root privileges either by logging in as root 'su' or using the 'sudo' command. In the following I assume you're logged in as root (su):
First, stop the HTTP server:
> apachectl stop
Create a file named: /etc/apache2/extra/httpd-subversion.conf (create the 'extra' directory if needed - or choose another directory entirely) with the following contents:
<Location /svn>
DAV svn
SVNPath /Users/Shared/svn
</Location>
In /etc/apache2/httpd.conf, add:
# Subversion
Include /private/etc/apache2/extra/httpd-subversion.conf
Also, uncomment the following lines (remove the '#' at the beginning of those lines):
LoadModule dav_svn_module libexec/apache2/mod_dav_svn.so
LoadModule authz_svn_module libexec/apache2/mod_authz_svn.so
We're almost done. Now, go to Server Admin and and click on 'Web' under the server you're configuring. Click 'Sites' on top. Choose the default site and then click 'Options'. Check the 'WebDAV' option and click 'Save'.

If it doesn't work, look at the web server's logs (Server Admin -> Web -> Logs). If there are no logs, Apache wasn't able to start - probably because of an error in httpd.conf or httpd-subversion.conf. Look at the server's logs (Server Admin -> your server name -> Logs; choose 'System Log' at the bottom).
Step 3 - Enabling Authentication
Assuming your server is configured with Directory Services, this is really a simple step.
Go to Server Admin -> your server -> Web (on the left). Click 'Sites' and choose the site under which you have configured /svn. Now click 'Realms':

On the left pane ('Realms'), click the '+' button at below the Realms box, and add the following info:
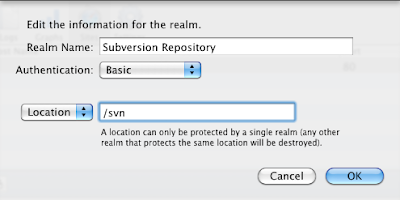
Click OK and then click on the Realm you've just created. On the right pane (Users & Groups), click the '+' button at the bottom and add users and groups you with to grant access to the repository (just drag them into the 'Users & Groups' box). When done, close the 'Users & Groups' selection window and make sure to configure the permissions you wish to grant to each user or group you've added.
Once done, click 'Save'.
Test your new setup using the same URL as above. You should now be prompted for username/password before you're granted access to the repository.
Note: the authentication method described above is not secure. You may want to consider using https instead for a more secure setup. Refer to the first link provided below for more information.
This post is based on the following articles:
Installing a Subversion server on Leopard
How To: Manage Your Own Subversion in Leopard
Subversion on OS X Leopard Server
I have recently purchased a Mac OS X server running Snow Leopard (Mini Server). I comes pre-loaded with lots of stuff, including a web server based on Apache2. I decided that this is a good opportunity to move all my code from local files, regularly backed up - to SVN.
I wanted my repository to be accessible easily using HTTP and also the ability to view it using a browser. In addition, although I'm the only programmer in the house, I wanted stuff checked-in to the repository be authenticated.
I took me quite some time as the built-in server gave me some troubles, but eventually I made it. Here's how:
Step 1 - Create a Repository
At first, I created the repository under 'svn' directory under my home folder (~/svn). I then decided that who knows, maybe my 3 month old son :) would use it some day - so opted to create it under /Users/Shared/svn:
> cd /Users/Shared
> mkdir svn
> svnadmin create svn
I wanted the repository to be accessible using HTTP, so I added:
> chown -R www svn
It is recommended to create at least one file or directory in this repository:
> cd ~
> svn co file:///Users/Shared/svn
> cd svn
> mkdir projects
> svn add projects
> svn ci
Step 2 - Make the Repository Accessible using HTTP
To access the repository using HTTP, I used Snow Leopard's built-in Apache2 server. This step can be done almost entirely using Terminal (command line) - with root privileges either by logging in as root 'su' or using the 'sudo' command. In the following I assume you're logged in as root (su):
First, stop the HTTP server:
> apachectl stop
Create a file named: /etc/apache2/extra/httpd-subversion.conf (create the 'extra' directory if needed - or choose another directory entirely) with the following contents:
<Location /svn>
DAV svn
SVNPath /Users/Shared/svn
</Location>
In /etc/apache2/httpd.conf, add:
# Subversion
Include /private/etc/apache2/extra/httpd-subversion.conf
Also, uncomment the following lines (remove the '#' at the beginning of those lines):
LoadModule dav_svn_module libexec/apache2/mod_dav_svn.so
LoadModule authz_svn_module libexec/apache2/mod_authz_svn.so
We're almost done. Now, go to Server Admin and and click on 'Web' under the server you're configuring. Click 'Sites' on top. Choose the default site and then click 'Options'. Check the 'WebDAV' option and click 'Save'.

Back to the command line, start Apache:
> apachectl start
...or, in Server Admin, click 'Start Web' (bottom left).
This should conclude step 2. Test it by opening Safari on the server and go to the following URL:
http://localhost/svn
You should see the root directory of your repository. If you created the 'projects' directory as mentioned above, you should see it there.
If it doesn't work, look at the web server's logs (Server Admin -> Web -> Logs). If there are no logs, Apache wasn't able to start - probably because of an error in httpd.conf or httpd-subversion.conf. Look at the server's logs (Server Admin -> your server name -> Logs; choose 'System Log' at the bottom).
Step 3 - Enabling Authentication
Assuming your server is configured with Directory Services, this is really a simple step.
Go to Server Admin -> your server -> Web (on the left). Click 'Sites' and choose the site under which you have configured /svn. Now click 'Realms':

On the left pane ('Realms'), click the '+' button at below the Realms box, and add the following info:
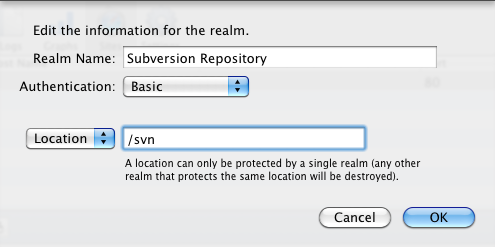
Click OK and then click on the Realm you've just created. On the right pane (Users & Groups), click the '+' button at the bottom and add users and groups you with to grant access to the repository (just drag them into the 'Users & Groups' box). When done, close the 'Users & Groups' selection window and make sure to configure the permissions you wish to grant to each user or group you've added.
Once done, click 'Save'.
Test your new setup using the same URL as above. You should now be prompted for username/password before you're granted access to the repository.
Note: the authentication method described above is not secure. You may want to consider using https instead for a more secure setup. Refer to the first link provided below for more information.
This post is based on the following articles:
Installing a Subversion server on Leopard
How To: Manage Your Own Subversion in Leopard
Subversion on OS X Leopard Server
Friday, December 17, 2010
Moving from Outlook 2010 to Google Calendar
Where I work, we use Exchange for calendars, emails, etc. It's great and I've been using it for years in many places I worked at. Over the years, I've created two offline calendars (PSTs) that went with me from place to place. One for events such as birthdays, anniversaries, etc. and the other for to do items (call XX on a specific day/time).
I realize that to manage to do items there are other tools (including Outlook's tasks) - but calendar is kind of universal and syncs with everything.
I decided that instead of moving these PSTs around all the time, I'll just put them in my Google account (Calendar). I did some Googling and found this. However, the File menu in my case, had the Save As... option disabled. The export option (File -> Options -> Advanced -> Export) can only export to a CSV file which has fundamental problem of not supporting recurring events (a big problem for my Birthdays calendar...).
So, instead of the File option mentioned in above link, I found the following 'Email Calendar' option in the 'Home' tab:

Clicking that will create a new email and open the following window:

Click the 'Show...' button under 'Advanced:' and make sure the two option are checked (if relevant). Click Ok. The new email window is now populated with the the calendar information. What you need is the attachment. Save it somewhere and dismiss the email (you don't need it).
Now go to your Google calendar and optionally create a new calendar to import to. You can also choose to import to an already existing calendar:

To import into the new (or existing calendar), go to settings (button/link to the right of 'Add' calendar) and click 'Import calendar':

Choose the .ics file you exported from Outlook and then the calendar to import events into:

Click 'Import' and you're done !
Syncing with iOS devices
Follow these steps to sync your iOS device with Google. Note that you will be using Exchange and not GMail. If you want to sync multiple calendars, follow these steps as well (they are referenced from the first page as well).
I realize that to manage to do items there are other tools (including Outlook's tasks) - but calendar is kind of universal and syncs with everything.
I decided that instead of moving these PSTs around all the time, I'll just put them in my Google account (Calendar). I did some Googling and found this. However, the File menu in my case, had the Save As... option disabled. The export option (File -> Options -> Advanced -> Export) can only export to a CSV file which has fundamental problem of not supporting recurring events (a big problem for my Birthdays calendar...).
So, instead of the File option mentioned in above link, I found the following 'Email Calendar' option in the 'Home' tab:

Clicking that will create a new email and open the following window:

Click the 'Show...' button under 'Advanced:' and make sure the two option are checked (if relevant). Click Ok. The new email window is now populated with the the calendar information. What you need is the attachment. Save it somewhere and dismiss the email (you don't need it).
Now go to your Google calendar and optionally create a new calendar to import to. You can also choose to import to an already existing calendar:
To import into the new (or existing calendar), go to settings (button/link to the right of 'Add' calendar) and click 'Import calendar':

Choose the .ics file you exported from Outlook and then the calendar to import events into:

Click 'Import' and you're done !
Syncing with iOS devices
Follow these steps to sync your iOS device with Google. Note that you will be using Exchange and not GMail. If you want to sync multiple calendars, follow these steps as well (they are referenced from the first page as well).
Monday, December 13, 2010
Installing Windows on MacBook Air
Installing Windows 7 on a Mac is easy. You just use BootCamp and you're ready to go. My situation is a bit different though. I want to install Windows and also dedicate a partition to my data. I usually separate my data from my OS partition so that if I need to reinstall the OS or upgrade, the data stays intact.
With MacBook Air (MBA, late 2010 model) the situation is a bit more difficult since it doesn't have an optical drive. I've created a "bootable" USB thumb drive using my 8GB SanDisk Cruzer micro - but it wasn't recognized as bootable by either VMware or my MacBook Pro. BootCamp also states that a remote drive will not work so I had to use an external DVD ROM plugged into the USB. I used Samsung SE-S084F, which costs £40.
Note: the original post contained screenshots but these were lost when saved as a draft... :(
My Specs
MacBook Air (late 2010 model)
256GB SSD
4GB RAM
2.13 Intel Core 2 Duo CPU
Samsung External DVD Writer Model SE-S084 Ver. F
Windows 7 Ultimate DVD
Preparations
The first step is to prepare the harddrive's partitions. There are multiple ways to achieve that, but I chose the following way:
1. Use BootCamp to create the partition for Windows
2. Use command line to create the partition to hold my data
I could use the command line for both, but by doing the above, it is always possible to decide to leave the machine with just 2 partitions - one for MacOS and one for Windows. The second step then becomes optional.
First, let's see how the current partitions table looks like (you don't need to type the trailing "\" after list):
> diskutil list
Now, let's run BootCamp (simplest way: hit Command-Space and then type "boot camp", hit Enter). Click 'Next' on all screens until the screen where you're prompted to download the drivers. Choose the default and let BootCamp assistant download them for you and burn them on a CD/DVD or USB drive; see this link for more details. You will not be able to download the drivers afterwards - so make sure you use BootCamp to download them at this stage.
Once you've downloaded the drivers, you'll get to the screen where you choose the partition size you want to use for Windows. I chose to give my Windows partition 60GB. It should be enough - generally, Windows will take ~20GB, other system files (pagefile, hiberfile) another 4-8GB and Program Files - another 10GB or so for a typical user. The rest will be used for user data.
In the final screen, click 'Quit & Install Later' - I want to finish the partitioning before starting the Windows installation.
When the BootCamp assistant finishes, you can have a look at how your partition table looks like:
> diskutil list
To create a new partition for the data, I will split the current Mac partition (disk0s2 in my case) into two. As I'm planning to use my machine mostly from my Mac, I'll use the Journaled HFS+ filesystem as the format. I will be able to read files from it from Windows after I'll install the BootCamp drivers. It is also possible to format it as FAT32 and later on, after installing Windows, reformat it as NTFS. Using FAT32 would have allowed me to read/write into that partition from both Windows and MacOS - but the 2GB maximum file size is a limiting factor for me. Using NTFS instead will eliminate this problem but would only give MacOS read access (not write).
The command to do this is again diskutil. You will need root access to perform these actions - which is why I preceded the relevant commands with sudo. I used the resizeVolume option which is very flexible. I chose to give my MacOS 85G and the data ~100G. You only have to get the size of the MacOS partition right. The command will automatically use all the remaining space for the 2nd (data) partition. I could have typed 77GB just as well and the data partition will still be 100.6GB (all the remaining space). I can't however, as expected, type a size that is bigger than the remaining space - the command will fail after a few seconds of running.
The below command essentially tells MacOS to resize disk0s2 (current size is 185.8 as seen above) to 85GB and then use the remaining space to create a Journaled HFS+ partition named "Data". Again, since I have to type in a size I typed 100G.
> diskutil resizeVolume disk0s2 85G jhfs+ Data 100G
That wraps up the partitioning part. We're now ready to install Windows.
Installing Windows
To install Windows, I hooked up the DVD drive into one of the USB ports, popped in the Windows installation DVD and rebooted MacOS. When the machine boots (you hear a sound), press and hold the Option (Alt) key until you'll see boot options (you need to click that key while the sounds sounds). Choose the DVD and you're ready to go.
I won't cover the process of completing the Windows installation here. Generally, after finishing the basic install, you'll need to install BootCamp drivers - which is what BootCamp assistant downloaded for you or you downloaded yourself.
Note that when installing, you install into the partition you created for Windows. It will have "BOOTCAMP" label and will be roughly the size you gave it (in my case, it was 60.4GB). You will need to click 'Advanced' and then 'Format' to format that partition in NTFS format.
Whenever you boot your MacBook Air (MBA), click the Option (Alt) key to choose which OS to boot to. If you don't, the machine will boot into the default OS. You can change the default OS in Windows Control Panel, under BootCamp or in MacOS - in Settings, under Startup Disk.
Some Notes
There are 3rd party software that allow you to read/write into JHFS+ partitions in Windows and also ones that will allow you to read/write into NTFS filesystems within MacOS.
Subscribe to:
Posts (Atom)