Sunday, August 5, 2012

Sharing iTunes Library over VPN

I have a very nice music library on my home Mac (iTunes). I share this library so when I'm at home, I can play music from the library from my laptop, mobile devices or even AppleTV. However, when I'm at work, the library is not visible, even though I have a VPN connection to my home (the server where iTunes is running is accessible).

I will not go through on how to set up a VPN connection to your home - as it highly depends on your router at home and other factors. If your router does not support VPN, SSH tunneling is probably your best bet. In this case, some of the instructions below may slightly defer.

As my server is already sharing my library at home, there is nothing I need to do on the server.

Windows


Generally, all you need is Bonjour-Beacon. Download the zip file, extract it somewhere and then launch BonjourBeacon.jar from the extracted directory. This tool publishes ZeroConf (aka Bonjour) services that the computer it is running on provides. In this case we want to publish that your computer provides iTunes Library Sharing service (daap). This service runs on TCP port 3689. Bonjour-Beacon doesn't of course provides this service but what it does is that whenever someone tries to access the service it publishes, it will forward the connection (kind of like proxy) to a different server that does provide the real service. In our case that will be the IP of the computer where the iTunes library is shared.


Here's an example of how to configure Bonjour-Beacon to redirect iTunes library sharing to another computer:

Profile Name:  type any text to describe your library
Host Name:     localhost
               NOTE:  From my experience, this has no meaning
                      except that it will show on your local
                      iTunes before you actually access the
                      remote library
Host MAC:      leave empty
Host IP:       type in the IP of the computer that has the
               library you want to share
Password:      false
Local OS:      Choose your OS (from my experience, you can choose
               anything here)
Protocol/Port: _daap._tcp./3689

The most important settings are Host IP and Protocol/Port. These essentially publish the service on your local network and tells Bonjour Beacon where to forward connections to the published service.

Once done, click the 'Add New' button to add the service. This will add the service but will not publish it just yet. To publish, click the 'Start' button:

That's it. Launch iTunes and you should see the library on the left pane under SHARED. Click it, and your remote library will load (time will depend on your library size and connection speed on both sides of the VPN tunnel).


Mac

Similar to Windows, you'll need software to proxy Bonjour from your local network over to your iTunes server accessible through VPN. For Mac, you'll need Network Beacon. The download button did not work for me. To download, click the 'Home' link on the left and then you'll have a direct download link on the right. Currently, this points to this link.

Once downloaded, open the .dmg files and launch Network Beacon.app. You may want to copy it to your Applications folder for future use.


The configuration is similar to Windows:
Service Name:   Text to describe the service being published (you
                can write any text)
Service Type:   _daap._tcp.
Port Number:    3689
Text Record:    leave empty
Host Name:      the host name of the computer that is sharing the
                iTunes library
IP Address:     the IP address of the computer that is sharing
                the iTunes library

Make sure both "Beacon Enabled" and "Enable Host Proxy" are checked.


Happy playing.


[29/Nov/2012 Update]

Troubleshooting iTunes Library Sharing

My Library sharing, either on LAN or VPN as described above, stopped working on one of my Windows 7 machines. It did work and then it stopped. I tried may things, including:

  • Disabling the firewall
  • Rebooting the Sharing machine and my Windows machine
  • Making sure Home sharing is enabled (not important but still)
  • Verifying both are running the same version of iTunes
  • Different launch sequences
  • Many combinations of the above
I believe, today after leaving the problem as it is for a while now, I found the root cause of the problem. My network connection is configured as a Home network as it should be (I'm at home...). However, I had recently refreshed my VMware Workstation to the latest version. It added a few network adapters (VMnet1 and VMnet8), used for host only and NAT between VMs (guests) and the host (my native Windows 7). Although no VM was running, those interfaces are enabled.

I noticed that in Control Panel -> Network and Internet -> Network and Sharing Center my PC is connected to the internet via "Multiple Networks" (map at the top of the page). I disabled the two virtual interfaces (one way of doing this is clicking 'Change adapter settings' on the left pane and then right clicking an interface and choosing 'Disable'). The map at the top of the page now correctly showed that I'm connected to the internet via a Home network. I quit iTunes and re-launched it and voila! Home Sharing now shows my shared library.

Thursday, July 19, 2012

Sending emails from Linux command line (bash)


I have built an automated system that pulls information from the web, analyzes it and puts the results of that analysis on a big monitor. I wanted to add to that some sort of an alert system so that when a specific event occurs, it will send me an email alerting me about the situation.

It’s mostly written in bash running on Linux, so I used mutt to do the email part.

To install mutt (I used a Ubuntu based distro), run the following as root:
apt-get install mutt

Configuring
For the email client to work properly, you need to configure a few parameters. You do that through creating and editing ~/.muttrc (using any text editor such as vi).

set from = “name@domain.com”    # the email address the email
                                # will appear to be coming from
set realname = “Amir Harush”    # the name that will appear as
                                # “from” in the recipient email
                                # client
set envelope_from=yes           # see below

The last line deserves some explanation. The protocol used to send emails in the internet is called SMTP. When sending an email, there are two parts that get involved: the email itself (which is what you see in an editor such as Outlook or Gmail) – which contains the subject, the body, recipients, etc. It also contains the from (your email address). This setting is the "from" setting in the configuration file (first line). Consider the email itself as the paper on which you write your letter (and also add the recipients, subjects, etc. to).

The other part that SMTP needs is the actual information that is needed to route the email to its intended recipients (TO, CC or BCC). It also needs information about who is sending the email. Continuing the previous analogy of paper, this part would be the envelope.

By default, mutt uses your computer’s domain and username to determine who is sending the email. In my case, it was ‘root@localhost’. Many mail servers will reject this address:
Diagnostic-Code: smtp; 573 root@localhost failed to route the address

To solve this, I had to add the last line to tell mutt to use the same address configured in ‘from’ for the envelope's ‘from’. That allowed my email server to accept the address as valid and allow the email to proceed to its intended recipient (me).

That’s it. Everything is now ready to send an email:
cat file_with_text.txt | mutt -s “Analysis Results” name@domain.com

You can also send attachments using the -a option. Run ‘man mutt’ for information on how to use mutt or go here.

Tuesday, May 8, 2012

Windows Backup and Mac OS X Server

My home network is mixed with Mac and Windows 7 machines. I use my Mac Server (10.7) as Time Machine server to backup my Mac OS machines - and that's working fine and pretty much out of the box.

To backup my Windows 7, I connected a 1TB drive to the server, formatted it for Mac (HFS) and created a directory 'wbackups' on that drive. That's where the backups will go.

I then went ahead and using Server Preferences, I created a new user 'wbackup' that will be used to access that backup directory:


I then granted that user access to the File Sharing service:

Back in Server Preferences, choose Groups and then make add the 'wbackup' user to the 'Workgroup' group. This step is critical otherwise you'll get an error message when you setup the backup on Windows.

Once the user setup is done, in Server Preferences click 'File Sharing' and add a new share pointing the directory you created for the backups (wbackup in my case):


That concludes the Mac OS X Server part. Now, Windows 7:

In Control Panel -> System Preferences click 'Back up your computer'. Then click 'Set up backup'. You should be getting something like this:


Click 'Save on a network'. Type in the path to your share on the OS X Server and the username and password you created earlier. Make sure to include the workgroup 'workgroup' in the username (as in: workgroup\wbackup) or else you will get error 0x80070043 (The specified network location cannot be used):

Once done, you're almost ready to begin your first backup. There is one more step to do - change the security policy of your computer. Apple's implementation of Ssmba, the protocol used to connect to network shares has a flaw. If you start your backup without the following workaround, it will always fail after running for a little while (for me it failed at around 14%). To fix that, click the 'Start' icon (lower-left corner) and type 'secpol.msc'. Hit return.

In the window that opens, navigate to Security Settings -> Local Policies -> Security Options. On the right pane, double-click 'Network security: LAN Manager authentication level' and choose 'Send NTLM response only':


You're all set. Click 'Back up now' to start the backup to your network share on you Mac OS X server.


Wednesday, July 6, 2011

Xcode 4 and your Apple ID

You can use Xcode's Organizer window to easily do actions such as adding a development device - saving you from logging into the developer's website and adding the device manually.

When using any of the Organizer's features that requires access to your developer's account for the first time, you'll be asked for your AppleID and password. Any subsequent use will be done silently without prompting you for those credentials.

What if you want to change the Apple ID you're using to a different account?

There's no setting or preference in which this is set. To do that, you need to go to the 'Keychain Access' application and filter the list to 'Passwords' (bottom left pane). Look for an entry called 'daw.apple.com' of kind 'Internet Password'. To verify this is what you need to delete, control-click it and choose 'Get Info'. In the window that pops up, you'll see the old Apple ID under Account.

Right click (control-click) the entry again and choose "Delete 'daw.apple.com'".

Quit and relaunch Xcode if it's open as it may have cached the old account information if it needed it. If you try to do something in the Organizer window that needs access to your developer account, you'll now be prompted for your new Apple ID account info.

Sunday, May 15, 2011

Xcode File Templates

When creating a new source code file (from a template for example), the file starts with a comment specifying my name and a Copyright notice containing 'private' as the company name. I wanted to change the company name to something other than 'private'.

I started grepping around my project files and found a setting ORGANIZATIONNAME in the project's project.pbxproj file. Digging further (this time in Xcode help) I found that the default for that setting is __mycompanyname__. But where did that come from?

It appears that it comes straight from my address book under the entry for my name. Changing it there caused all my new Xcode projects to use the new company name. I had to restart Xcode for the change in the Address Book to take effect.

In order to change the setting for a specific project, this setting can also be changed from Xcode 4 IDE:
1. Click the blue project icon in the Project Navigator
2. Open the attributes window / pane (Command-Option-1)
3. In 'File Inspector' tab, under 'Project Document', you'll find the 'Organization' setting.

(the new setting will affect only new files).


References: StackOverflow

Thursday, April 21, 2011

Setting up Subversion on Mac OS X Server

In the past I used to use CVS locally on my machine. I loved CVS, but I love Subversion even more.

I have recently purchased a Mac OS X server running Snow Leopard (Mini Server). I comes pre-loaded with lots of stuff, including a web server based on Apache2. I decided  that this is a good opportunity to move all my code from local files, regularly backed up - to SVN.

I wanted my repository to be accessible easily using HTTP and also the ability to view it using a browser. In addition, although I'm the only programmer in the house, I wanted stuff checked-in to the repository be authenticated.

I took me quite some time as the built-in server gave me some troubles, but eventually I made it. Here's how:

Step 1 - Create a Repository

At first, I created the repository under 'svn' directory under my home folder (~/svn). I then decided that who knows, maybe my 3 month old son :) would use it some day - so opted to create it under /Users/Shared/svn:

> cd /Users/Shared
> mkdir svn
> svnadmin create svn

I wanted the repository to be accessible using HTTP, so I added:
> chown -R www svn

It is recommended to create at least one file or directory in this repository:
> cd ~
> svn co file:///Users/Shared/svn
> cd svn
> mkdir projects
> svn add projects
> svn ci


Step 2 - Make the Repository Accessible using HTTP

To access the repository using HTTP, I used Snow Leopard's built-in Apache2 server. This step can be done almost entirely using Terminal (command line) - with root privileges either by logging in as root 'su' or using the 'sudo' command. In the following I assume you're logged in as root (su):

First, stop the HTTP server:
> apachectl stop

Create a file named: /etc/apache2/extra/httpd-subversion.conf (create the 'extra' directory if needed - or choose another directory entirely) with the following contents:
<Location /svn>
   DAV svn
   SVNPath /Users/Shared/svn
</Location>

In /etc/apache2/httpd.conf, add:
# Subversion
Include /private/etc/apache2/extra/httpd-subversion.conf

Also, uncomment the following lines (remove the '#' at the beginning of those lines):
LoadModule dav_svn_module libexec/apache2/mod_dav_svn.so
LoadModule authz_svn_module libexec/apache2/mod_authz_svn.so

We're almost done. Now, go to Server Admin and and click on 'Web' under the server you're configuring. Click 'Sites' on top. Choose the default site and then click 'Options'. Check the 'WebDAV' option and click 'Save'.


Back to the command line, start Apache:
> apachectl start

...or, in Server Admin, click 'Start Web' (bottom left).

This should conclude step 2. Test it by opening Safari on the server and go to the following URL:
http://localhost/svn

You should see the root directory of your repository. If you created the 'projects' directory as mentioned above, you should see it there.


If it doesn't work, look at the web server's logs (Server Admin -> Web -> Logs). If there are no logs, Apache wasn't able to start - probably because of an error in httpd.conf or httpd-subversion.conf. Look at the server's logs (Server Admin -> your server name -> Logs; choose 'System Log' at the bottom).


Step 3 - Enabling Authentication

Assuming your server is configured with Directory Services, this is really a simple step.

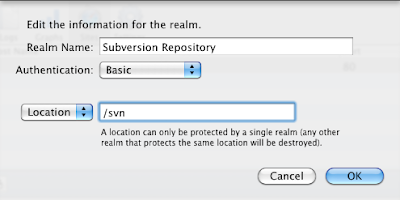
Go to Server Admin -> your server -> Web (on the left). Click 'Sites' and choose the site under which you have configured /svn. Now click 'Realms':

On the left pane ('Realms'), click the '+' button at below the Realms box, and add the following info:

Click OK and then click on the Realm you've just created. On the right pane (Users & Groups), click the '+' button at the bottom and add users and groups you with to grant access to the repository (just drag them into the 'Users & Groups' box). When done, close the 'Users & Groups' selection window and make sure to configure the permissions you wish to grant to each user or group you've added.

Once done, click 'Save'.

Test your new setup using the same URL as above. You should now be prompted for username/password before you're granted access to the repository.

Note: the authentication method described above is not secure. You may want to consider using https instead for a more secure setup. Refer to the first link provided below for more information.


This post is based on the following articles:
Installing a Subversion server on Leopard
How To: Manage Your Own Subversion in Leopard
Subversion on OS X Leopard Server

Friday, December 17, 2010

Moving from Outlook 2010 to Google Calendar

Where I work, we use Exchange for calendars, emails, etc. It's great and I've been using it for years in many places I worked at. Over the years, I've created two offline calendars (PSTs) that went with me from place to place. One for events such as birthdays, anniversaries, etc. and the other for to do items (call XX on a specific day/time).

I realize that to manage to do items there are other tools (including Outlook's tasks) - but calendar is kind of universal and syncs with everything.

I decided that instead of moving these PSTs around all the time, I'll just put them in my Google account (Calendar). I did some Googling and found this. However, the File menu in my case, had the Save As... option disabled. The export option (File -> Options -> Advanced -> Export) can only export to a CSV file which has fundamental problem of not supporting recurring events (a big problem for my Birthdays calendar...).

So, instead of the File option mentioned in above link, I found the following 'Email Calendar' option in the 'Home' tab:

Clicking that will create a new email and open the following window:

Click the 'Show...' button under 'Advanced:' and make sure the two option are checked (if relevant). Click Ok. The new email window is now populated with the the calendar information. What you need is the attachment. Save it somewhere and dismiss the email (you don't need it).

Now go to your Google calendar and optionally create a new calendar to import to. You can also choose to import to an already existing calendar:

To import into the new (or existing calendar), go to settings (button/link to the right of 'Add' calendar) and click 'Import calendar':

Choose the .ics file you exported from Outlook and then the calendar to import events into:

Click 'Import' and you're done !


Syncing with iOS devices
Follow these steps to sync your iOS device with Google. Note that you will be using Exchange and not GMail. If you want to sync multiple calendars, follow these steps as well (they are referenced from the first page as well).