To backup my Windows 7, I connected a 1TB drive to the server, formatted it for Mac (HFS) and created a directory 'wbackups' on that drive. That's where the backups will go.
I then went ahead and using Server Preferences, I created a new user 'wbackup' that will be used to access that backup directory:

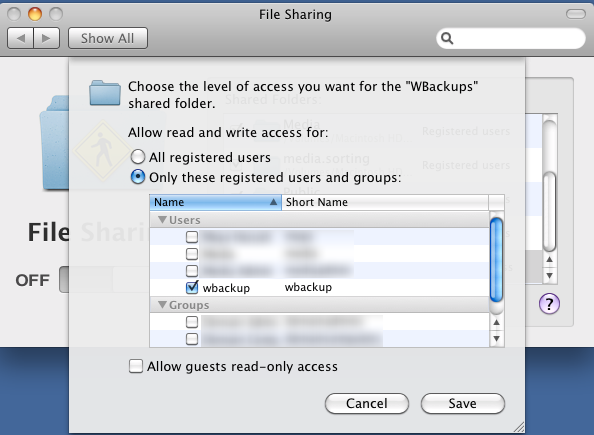
I then granted that user access to the File Sharing service:

Back in Server Preferences, choose Groups and then make add the 'wbackup' user to the 'Workgroup' group. This step is critical otherwise you'll get an error message when you setup the backup on Windows.
Once the user setup is done, in Server Preferences click 'File Sharing' and add a new share pointing the directory you created for the backups (wbackup in my case):
That concludes the Mac OS X Server part. Now, Windows 7:
In Control Panel -> System Preferences click 'Back up your computer'. Then click 'Set up backup'. You should be getting something like this:

Click 'Save on a network'. Type in the path to your share on the OS X Server and the username and password you created earlier. Make sure to include the workgroup 'workgroup' in the username (as in: workgroup\wbackup) or else you will get error 0x80070043 (The specified network location cannot be used):

Once done, you're almost ready to begin your first backup. There is one more step to do - change the security policy of your computer. Apple's implementation of Ssmba, the protocol used to connect to network shares has a flaw. If you start your backup without the following workaround, it will always fail after running for a little while (for me it failed at around 14%). To fix that, click the 'Start' icon (lower-left corner) and type 'secpol.msc'. Hit return.
In the window that opens, navigate to Security Settings -> Local Policies -> Security Options. On the right pane, double-click 'Network security: LAN Manager authentication level' and choose 'Send NTLM response only':

You're all set. Click 'Back up now' to start the backup to your network share on you Mac OS X server.
Hi is this method of backup secure ? I'd like to backup,my small office of 5 windows machines to my mac server which is at a different location on a different internet provider also I already have SSL certificates on my offsite mac server thanks so much :)
ReplyDeleteThis comment has been removed by the author.
ReplyDeleteHi Amir,
ReplyDeleteYour article is the best I’ve found regarding Windows backup to OS X server. However I'm still getting either error 0x8007052E (Logon Failuer) if I set the LAN Manager authentication level to "NTLM Response only" as you suggest or error 0x8007054F if I set it to "NTLMv2 Response only".
I'm using Windows 7.
Have you tried this with an updated OS X Server? I'm running OS 10.10.5 (Yosemite) with server 5.0.15
Out of my wits here. Any help will be tremendously appreciated.
Cheers,
Andres
Hi, I'm trying to setup backup from a windows 10 computer (File history) to a mac external drive. My computer isn't running server, but it should work the same way, but I'm getting an error that says "Could not enable File History The system cannot find the file specified" Any ideas what I'm doing wrong?
ReplyDeletePretty good post. I just stumbled upon your blog and wanted to say that I have really enjoyed reading your blog posts. Any way I'll be subscribing to your feed and I hope you post again soon. Big thanks for the useful info. Almost all Wallet Ibox Apps Fresh Free PC - Avoid Hang Around Seeking, Move through Info on Cell Desktops In this article password protect files free download
ReplyDeleteCan you tell us more about this? I'd care to find out more details.
ReplyDeleteCheck these guys out: The Ultimate Guide To Encryption Software & Ten Ways To How To Encrypt A Password For Free Persuasively
I am glad that I saw this post. It is informative blog for us and we need this type of blog thanks for share this blog, Keep posting such instructional blogs and I am looking forward for your future posts.
ReplyDeleteCyber Security Projects for Final Year
JavaScript Training in Chennai
Project Centers in Chennai
JavaScript Training in Chennai
Mmorpg oyunları
ReplyDeleteinstagram takipçi satın al
tiktok jeton hilesi
tiktok jeton hilesi
antalya saç ekimi
İnstagram takipci satın al
instagram takipçi satın al
Metin2 Pvp Serverler
instagram takipçi satın al
özel ambulans
ReplyDeletenft nasıl alınır
en son çıkan perde modelleri
uc satın al
en son çıkan perde modelleri
minecraft premium
lisans satın al
yurtdışı kargo